


This article offers a diverse mix of topics that can help you with big wall climbing, aid climbing, or climbing on big walls in general. It's not a textbook, but rather a selection of tips and tricks to supplement standard climbing knowledge. Enjoy reading – and dreaming of your next climb!
Transparency note from Fritz Miller: In this post I mention a few products, including those from the company... EdelridThis is a company I work with. There are no connections to other products or their manufacturers mentioned here. All descriptions are honest.

Equipment, clothing and footwear
Clothing
Longer-cut tops with good stretch properties are essential so they don't ride up out of your harness while climbing. Avoid layering. Three layers plus an insulated jacket for belaying and bivouacking should suffice. For jackets, remove the cord locks from the hem and knot the elastic instead. This reduces pressure points under your harness! If climbing in sunny weather and high temperatures, a sun hoodie is a good idea (instead of a fleece/softshell jacket). For multi-day trips, choose shirts and socks with a high merino wool content. Don't choose socks that are too short, as cold winds often penetrate up your trouser legs.

Shoes
The combination of approach shoes and comfortable, somewhat sturdy climbing shoes is usually a good choice. If the sole of your approach shoes extends beyond the inside of your big toe, you can have it filed down, which will significantly improve your footing on small footholds. However, for challenging approaches with heavy loads, as well as for difficult aid routes, I prefer lightweight mountaineering boots. Their climbing performance is quite similar to that of approach shoes, they offer greater security in trackless terrain, and you'll have a more relaxed stance on ladders. For climbing, whether free or aid, a shallow tread depth is very advantageous.

Bigwall tether
At the Big WallFor technical climbing, a comfortable harness is essential. Especially when climbing with a ladder and a highstep (highstep into the second rung), there's a significant pull on the hips. Therefore, a stable waist belt is crucial, as it distributes the load evenly across the outer hips. The waist belt's stability is also important when carrying a lot of gear in the gear loops. I use the Edelrid Helios, which is quite lightweight and folds up well. It also features a sturdy Ice Clipper loop – an important feature for carrying a hammer and for winter climbing.
Semi-automatic for big walls: Grigri or Pinch?
If the rope hangs down in large loops, dispensing using the gasworks method is cumbersome. It works better in the "tube style." Here, the pinch The Pinch performs significantly better than the Grigri. Another advantage of the Pinch: When rappelling on thin ropes (e.g., haul ropes) or with heavy loads, you have additional braking power thanks to the rope guide through the notch. Tip: Unlike in sport climbing, the device is not attached directly, but rather to the belay ring using a carabiner. When rappelling, run the brake rope through an additional carabiner, which is clipped to the belay ring below the device. Officially, the Pinch requires a minimum diameter of 8,5 mm, but rappelling with the described technique also works very well with slightly thinner ropes. However, the Grigri also has its advantages in big wall climbing: It is somewhat lighter and more compact.
Wedge remover
Each rope team should take two nut removers. They are essential all-round tools, for example, for cleaning out cracks and threading slings. The second climber's nut remover should be strong enough to withstand a hammer blow. For removing the smallest nuts, it's crucial that the tool's thickness tapers towards the bottom. Otherwise, you won't be able to grip the micro-nut!
Beaks/Peckers
The most important anchors for aid climbing! Remove wire slings (except for tomahawks – they're well-made there), then tie short cord loops to the top and bottom of the beak. Kevlar is best for the bottom loop. The upper loops are for attaching to your harness and act as spacers when hammering into dihedrals, making it easier to hit the beak. Straighten and deburr the beaks after each climb. Replace the slings from time to time. The common serration unfortunately causes the tips to break off. This is often indicated by a fine crack. The beak can then be shortened and reused.

Screamer (energy absorber)
Since 2025, Screamers have finally returned to the European market: The Edelrid G-Screamer They are lightweight, compact, and versatile. Their primary use is as screamer quickdraws for questionable intermediate protection. The seams tear at 3 kN, thus keeping the load on the anchor point below 4 kN. They are highly recommended for aid climbing from A3 upwards, and it's good to carry a handful.
Role-Executioner
The secret weapon against rope drag on zigzag rope lengths. In the setup shown, with Edelrid Axiom pulley carabiners and Nineteen G carabiners, this pulley quickdraw is hardly heavier than a regular quickdraw. Its effectiveness on winding rope runs, however, is enormous! Two to three are more than enough.

Short loops
Short loops are helpful for a wide variety of applications:
- Tying off standard hooks.
- Threading a standard hook when a carabiner cannot be clipped.
- Extending cams or adding hooks when quickdraws are running low.
- As loops for lower-outs.
- Hardware organization.
- Tying of clamp knots.
- Attaching rope clamps during simultaneous climbing.
- Extended attachment of the belay device when rappelling with a backup belay
I use the following types:
- 30 Dyneema loops (8 mm width).
- Loops made of 6 mm Kevlar rope, usable length 20 – 25 cm, loosely knotted so that the knots can be opened quickly.
- For complex projects, also have a few very short loops of 5 mm accessory cord for bundling backup material.

Loops for hooks
For Talon and Cam Hooks, I like to use self-knotted slings made of thin Dyneema material: cut up discarded webbing slings and knot them with a double sheet bend (the knot strength is easily sufficient for this application).
The BD Cliffhanger is relatively robust and extends further down. Occasionally, you can hammer this hook into rock flakes and leave it in place as an anchor point in combination with a Screamer. For this reason, I've tied on an even stronger sling made of mixed fabric here.
If you tie the loops so that the overhand knot is against the hook (as shown in the picture for the BD Grappling Hook), then the loop must be strong enough to clamp securely and not slip out. Keep the loops generally short.

Mats for wall bivouacs
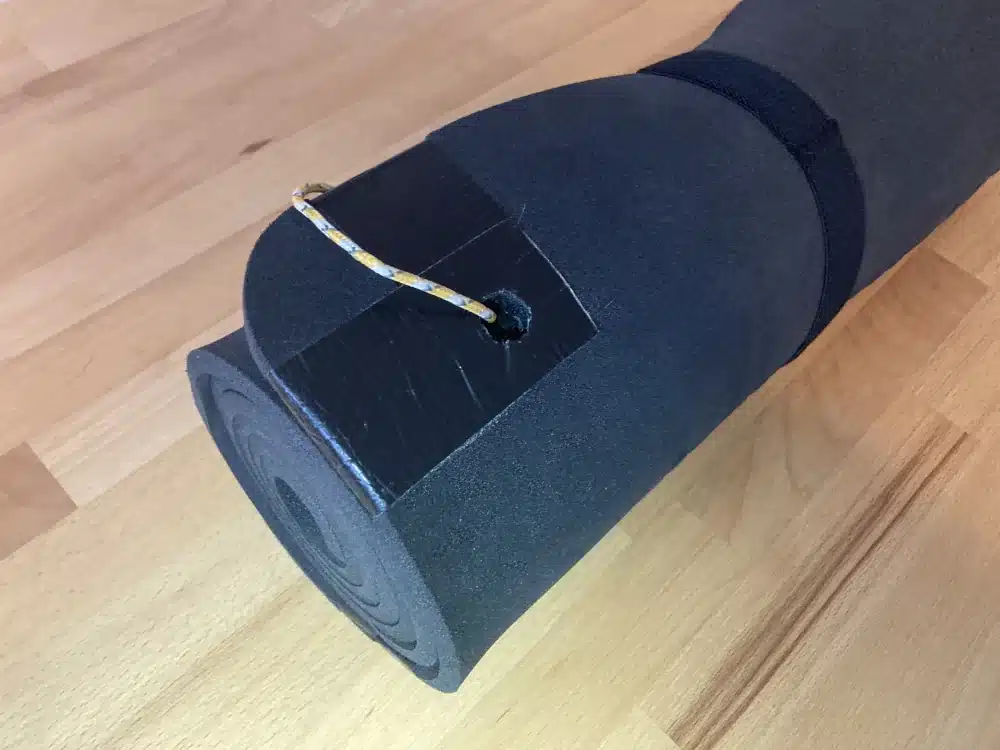
The most suitable mats for big wall climbing are thin Evazote foam mats, 5-10 mm thick. Depending on the intended use, they can be trimmed slightly. A shorter mat is better suited for lining the haul bag and, logically, takes up less storage space. A slight taper towards the foot end is also advisable, as are one or two holes reinforced with duct tape to secure the mat against loss.
Security technology and haul system
Switching from HMS fixed point belay to body belay
At trad belay stations or low-positioned anchors, we often start with an HMS fixed-point belay and later, once reliable intermediate protection is clipped, switch to body belaying with a semi-automatic carabiner. This approach works even if the lead climber is significantly heavier than the belayer. On exposed routes with poor protection, it's generally crucial that the belayer wears a helmet and gloves. A big fall could throw them against the wall, and using an HMS fixed-point belay could lead to excessive rope slippage!
Ohmega dummy
The amount of hardware on the lead climber's harness quickly leads to critical weight differences. A simple solution (at bolted anchors): body belay with a semi-automatic belay device + Edelrid Ohmega as a dummy. This way, the belayer isn't thrown so violently into the belay position in the event of a fall!
The haul system
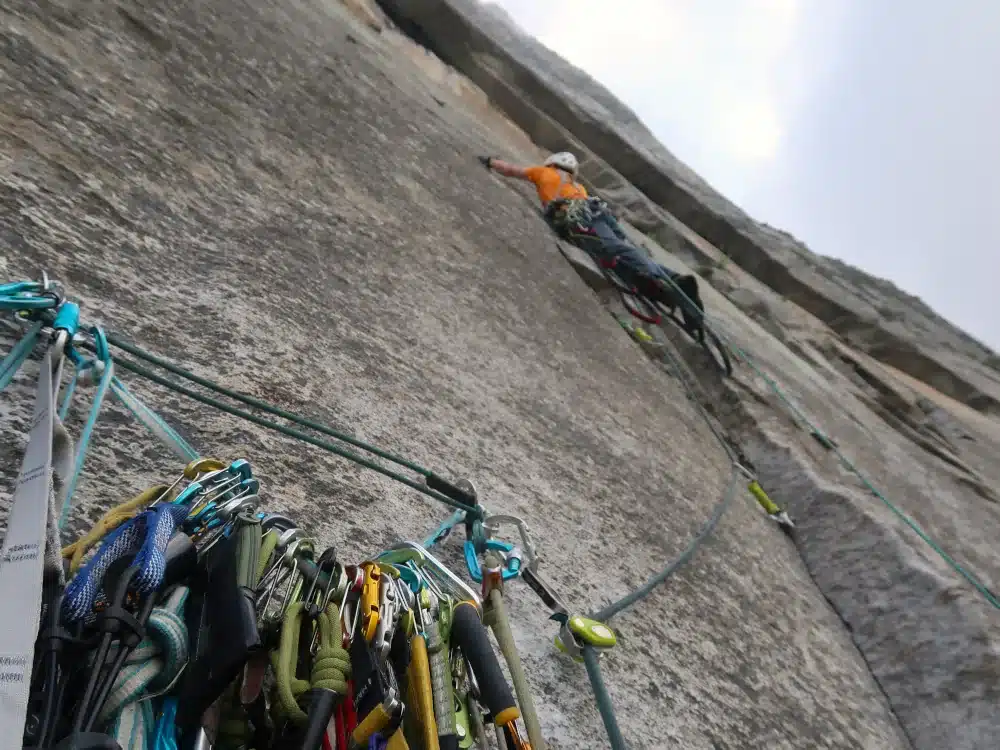
- Carry a second rope clamp: as a backup in case of loss, as a rope clamp for bodyhauling, or as a backstop when stowing the haul rope in the Tillit rope bag. I use the lightweight, compact Spoc clamps, which are suitable for small to medium loads. I've always been able to haul two medium-sized haul bags with water and gear for three to four days without any problems using the Spocs.
- A trick for shorter rope lengths: The second climber attaches the pinch/grigri to the haul rope. The lead climber then pulls it up with the excess haul rope and can use it for body hauling. This way, the second pulley rope clamp isn't needed for body hauling and can instead be used as a redirect and backstop for stowing the haul rope.
- Haul rope: The Edelrid Starling Protect half rope (8,2 mm) has proven to be the ideal haul rope for me. It's grippy, supple, relatively light, and yet strong enough for heavier loads as well as for securing rope lengths. The Kevlar content provides additional safety should the rope run over edges.
- Knot protector: The neck of a 1-liter PET bottle is the right size. Don't cut it too short; leave it a little longer. Cover the sharp edge with duct tape and tie on a 3 mm accessory cord. Use this cord to connect the haulbag swivel and the knot protector.
- Lower-out line: It's better to use an additional 6mm accessory cord, not the excess haul rope. Often 10 meters is sufficient. For long traverses, the line can also be lengthened by tying on a second accessory cord.
- Tillit rope bag: An ingenious helper when working with the haul rope. Rope chaos at the belay station is now a thing of the past!

Food and water
Provisions for multi-day tours
Don't rely too heavily on energy bars, sweets, and instant food. Pack as many natural foods as possible: bread, cheese, nuts, dried fruit, apples, oatmeal, powdered milk… Also always include: sugar-free chewing gum, tea bags, instant coffee, isotonic drink powder, and bouillon cubes.
Jetboil modifications and tips
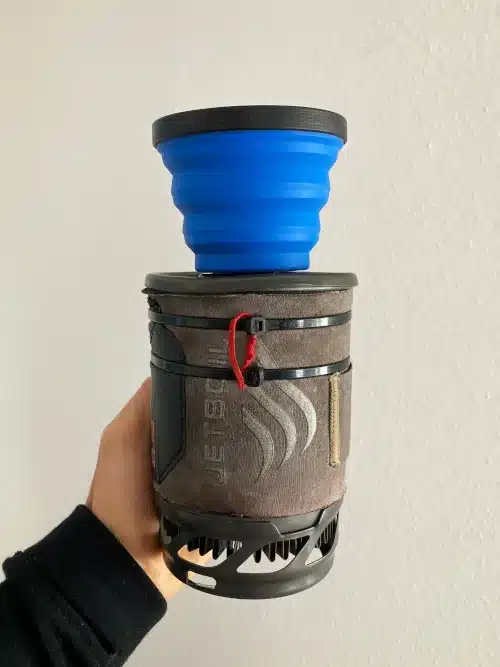
Over the years, we've had some problems and several complete failures with the Jetboil. But since I don't know of anything better, I just keep using it… It's important to be able to secure your stove and hang it up if needed. A simple hanging kit can be made with cable ties, thin cord, and two mini carabiners (see picture). Have needle-nose pliers handy for tightening the knots. If the bayonet fitting between the stove and pot is too loose, bend the metal plate slightly so the connection holds securely!
Cup: The included cup (protecting the heat exchanger) usually broke quite quickly for me (except for the version made of black, opaque plastic). However, there is a significantly better alternative to the original: the Sea to Summit X-Cup collapsible cup, with a 250 ml capacity, fits inside the pot for transport, along with a small gas canister and the stove. It's a discontinued product, but there are still some remaining stocks available.


Gas cartridges: With screw-on cartridge systems, it sometimes happens that certain stoves don't work with certain cartridges. Therefore, I always check before a trip to make sure gas is actually flowing through.
Gas quantity for a two-person rope team: With the described setup and in mild temperatures, 100g is just enough for three bivouacs. For melting snow in winter, calculate at least three times that amount!

Water bottles, drinking bottles and water bags
Two-liter disposable PET bottles are ideal. They're easy to flatten, and these days the caps are even attached… Pack a few smaller, more manageable bottles as well. Start drinking the sugary concoction in good time, then collect the bottles! Remove the labels and attach a hanger made of thin cord (a sturdy shoelace will also do…). Tie the loop around the bottle neck with a poacher's knot or a triple barrel knot.
A 0,5-liter Nalgene bottle per person is convenient for making tea, as a small bottle for when you're out and about, and as a hot water bottle in a bivouac. It's important to note that the plastic clip between the bottle and the lid isn't designed for hanging things. While it will work, you shouldn't put too much strain on it. If you're frequently out on the trail, the robust water bags from Ortlieb, which already come with a sturdy carrying handle, are a worthwhile investment. The 2-liter version is also recommended here.

Water quantities per person per day (for multi-day tours with bivouacs)
This is based on my own experience. The water for cooking is already included. You will be slightly dehydrated with this calculation, but you shouldn't suffer.
- Cold weather: 1,5 liters, from 3 days: 2 liters
- Moderate conditions (rather cool/shady): 2 liters, from 3 days 2,5 liters
- Warm weather and plenty of sunshine (e.g., El Capitan in autumn): 3 l
Protect and care for hands
Gloves and tape
Sore hands and skin injuries are no fun, but most problems can be dealt with quite well. First and foremost: wear gloves!

- Crack climbing gloves: Especially for granite routes with many hand cracks (best example: Nose on El Cap).
- Aid climbing gloves with free fingertips: Essential for routes with difficult or sustained aid climbing. This type can be made from worn-out, thin leather gloves (cut off the fingertips and reinforce them with loosely applied Leukotape).
- Leather belay gloves. These all-rounders are essential and can be used for belaying, rappelling, cleaning, and also for strenuous approaches and descents, as well as for easy free climbing. Important: they should offer a good grip and be quick to put on and take off!
Also, wear some Leukotape on your belt so you can react quickly if needed. It's better to tape it now than to wait until the problem gets worse.

Hand lotion
Moisturize your chapped hands with cream in the evening. This helps your skin recover better overnight and promotes the healing of minor injuries. In my opinion, solid, rub-in creams, especially those sold in small aluminum tins for climbers, are best. They're quite expensive, unfortunately, but absolutely essential for climbing!
Fingernails
Cut your nails before the tour, but definitely not too short (this would encourage painful nail shedding). Treat any torn fingernails: The small Victorinox Classic SD (only 21 g) provides both scissors and a nail file, and the knife also functions as a rope knife for emergencies.
Hygiene and other incidents
Poop Tube (Alternatives)
Improvised "Poop Tube": You can make an improvised "poop tube" for one use from a 1-liter PET bottle and duct tape. Keep in mind that you'll need quite a bit of tape and, of course, plastic bags (preferably black garbage bags, about 30 liters in volume). Do your business in one garbage bag and then transfer everything to a second. Cut the bottle open (only as much as necessary), fill it, and seal it with duct tape.
For multiple loads, we carry a small screw-top barrel (canoe barrel), which is lightweight and sturdy, easy to attach, and fits in the haul bag for the descent. The budget option: a 5 kg pickle barrel with a screw-top lid. We improvised with this once in Yosemite Valley, and it worked perfectly.

Hand disinfection
Washing your hands inside the wall is difficult. However, a small bottle (50 ml) of hand sanitizer will do the trick and should be carried along and used as needed!
vermin
In the Voralp Valley (Uri Alps), there have been many mosquitoes in some years. During the approach to the Poncione d'Alnasca (Ticino), we repeatedly encountered an immense number of ticks, so much so that we had to remove several while on the rock face. Therefore, if in doubt, pack insect repellent spray and tweezers.
Mixed things
Electronics
Put your smartphone in airplane mode and only use it when absolutely necessary (take a paper map with you!). Carry your smartphone in a chest pocket if possible, especially in cold weather. Secure your device against loss. For multi-day trips, don't forget a small power bank and a short charging cable! On trips in autumn or winter, we always carry a small spare headlamp. Important: Always lock the headlamps in your haul bag!

Small items
Pack provisions, small items, etc., in small bags and pouches with loops for attaching them. The pouches that climbing harnesses come in are ideal, as the contents are visible, saving you time rummaging around! A lightweight dry bag with a D-ring for attaching it is perfect for spare clothing.
Standing arrangements
For projects requiring a lot of gear, it's best to hang a short daisy chain between the anchor bolts, to which you can clip the spare gear. This way you can quickly access it if the lead climber needs something.

Carry a third ladder
For many routes, it's sufficient for the lead climber to have two ladders and the second none. However, for long, complex routes, a third, lighter ladder is recommended, which the second carries, for example, for following traverses or roofs. The third ladder also serves as a backup should one get lost. In this case, it would be ideal if the spacing of the rungs on the third ladder matches that of the two main ladders.
Tape
Small amounts of duct tape can be wrapped around a lighter. For slightly larger amounts, I have an aluminum tube with a cord attachment for hanging it from my belt. I also have some Leukotape/finger tape attached to it for covering minor finger injuries.

To-do list and packing list
Finally, the most important tip for top-notch travelers: Prepare your tours early with a to-do list and a detailed packing list!
Text: Fritz Miller, November 2025
About the author

Fritz Miller, born in 1984 in Reutlingen, Germany, is a professional mountain guide and all-around alpinist. He has climbed challenging peaks in Patagonia and the Karakoram, soloed the legendary "Fish Route" in winter, and has completed speed ascents of several major Alpine classics, including a winter ascent of the Eiger North Face in just over five hours. Together with his wife Michaela, Fritz made the first ascent of the extremely difficult winter direct route of the Zugspitze North Face. Fritz shares his experience as a youth coach for the German Alpine Club and as an author of specialist articles. He lives with his family in Feldkirch, Austria.